Views: 9
How do I connect ONE Nova Floodlight camera to a NVR/DVR?
LaView DVR NVR Ipcamera Firmware Upgrade All Model
- Ensure the ONE Nova is connected to your WiFi network. (If not, follow this instruction)
- Ensure the NVR/ DVR and the doorbell camera are on the same Local Area Network
- Download and install the SADP IP Portal program. Download here.
- Locate the IPv4 Address of the doorbell camera in SADP program
5. Log into the NVR and go to Main menu> Camera> Camera. Click on Edit button of a vacant channel.
6. Change ‘Adding method’ from ‘Plug&Play’ to ‘Manual’
7. Enter the IP Camera Address located in Step 4
8. Choose ‘Protocol’ to ‘LaView’
9. Enter the Password to your doorbell camera. The default password is the verification code located on the label of the back panel of the camera.
10. Click ‘OK’ to save. The camera should show up in the NVR/DVR after a couple seconds.
Troubleshooting:
- Ensure the camera is online. Use your mobile App to confirm if you can get the camera feed.
- Ensure the NVR and Floodlight camera is connected to the same router/network. Meaning they should have same IP gateway and IP address range. (In the first diagram above, LV-N9616D6E NVR – IP 192.168.0.122 has the same IP range as the LV-PWFL182-U Floodlight camera 192.168.0.88) Use the SADP tool to check and configure the IP addresses of both devices.
- Check the recorder specification to ensure the NVR/DVR support 3MP IP camera.
- Ensure NVR and Camera are on the latest firmware.
- Reset Doorbell camera by pressing and hold the reset button. Connect to the network again.
How do I see ONE Halo on PC/Mac
- Ensure the camera is set up by LaView ONE App and registered to a LaView P2P account
- Download and install LaView Net Guarding Expert Program for Windows / Mac
- Go to Control Panel> Device Management
4. Click on ‘Add New Device Type’
5. Check ‘Laview P2P Device’ and click OK
6. Click on ‘LaView P2P Device’ under Device Type list
7. Login to your LaView P2P account created in the LaView ONE App. (LaView P2P Account must be created using either LaView NET, LaView ONE or LaView Connect)
8. If this is the first time adding the camera to the Client software, enter the Device password in the Modify Netinfo menu.
9. Go the ‘Main View’ window, double-click the doorbell camera under your account to stream the camera.
I am getting error code 102030 when trying to add my NVR to my P2P account.
You’ll need to upgrade the systems firmware to fix the P2P issue. Please follow the instructions below to do this.
Please download and upgrade to this firmware here: https://www.dropbox.com/s/h9lhb43upwnq8d3/digicap.mav?dl=0
Once you have that file, put it on a flash drive and connect the flash drive to the NVR. Go to Main Menu>Maintenance>Upgrade and click on the Digicap file, then upgrade at the bottom. Once this is complete the system will reboot, and you should have the newest firmware.
Once the system has the newest firmware, try adding it to the P2P account again and you shouldn’t get any more errors.
Below are some instructions on how to upgrade the firmware with a flash drive:
Please use the information below to upgrade the NVR firmware using a USB flash drive.
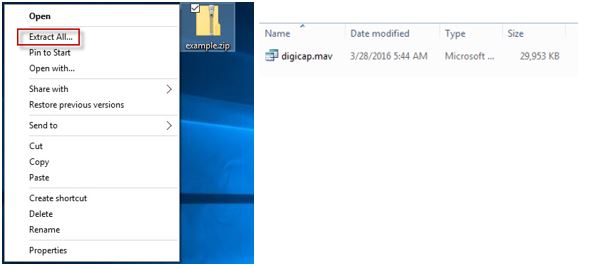
- Unzip the file by extracting the contents(If file is .rar or .zip). It should be a digicap file, place the file on a USB flash drive.
- Enter the upgrade interface of the NVR. Select update file from USB device.
Menu>Maintenance>Upgrade
- Select Upgrade and the system will reboot when the upgrade is complete.
Below are instructions to upgrade the firmware through the web interface:
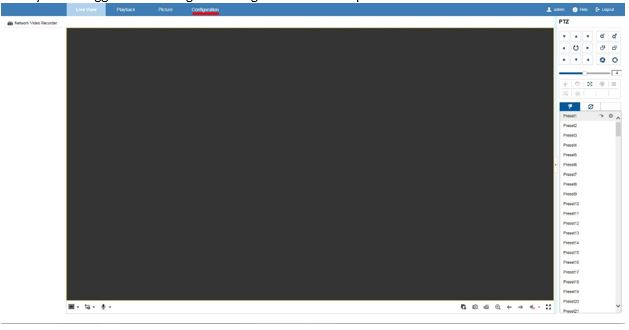
Please follow these steps to upgrade your firmware version for your NVR. This process will be done using the web interface. To access that, enter the local IP address into Internet Explorer. Be sure to download and install the plug in when you first visit the web interface.
To obtain the local Ip Address for the NVR follow these quick instructions:
These steps will be performed from the NVR system directly.
Open the main menu and go to Maintenance>System Info>Network. In there you will have a section called IPv4 Address. This is your local IP address, and the one you will be using to access the web interface.
Once you enter the Local IP address onto Internet Explorer, you will be promoted to log into your system. Use the log in credentials that you would from the system itself.
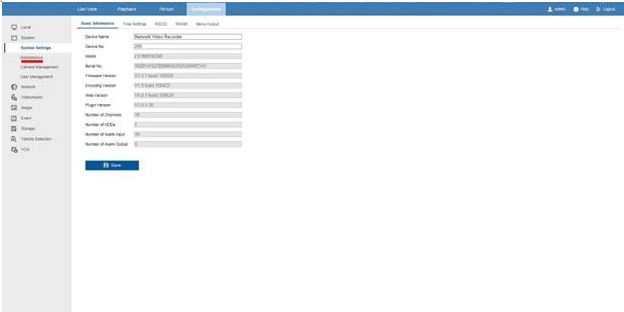
Once you are logged in we will go to Configuration at the top of the screen.
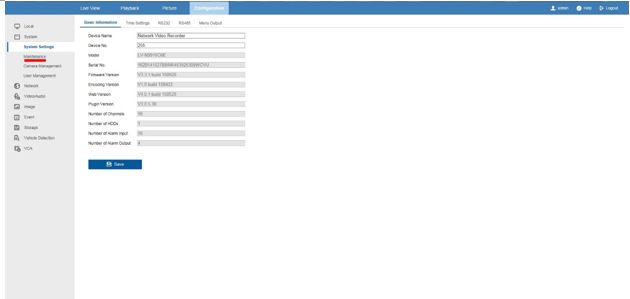
Then we will click on Maintenance on the left-hand side under System Settings
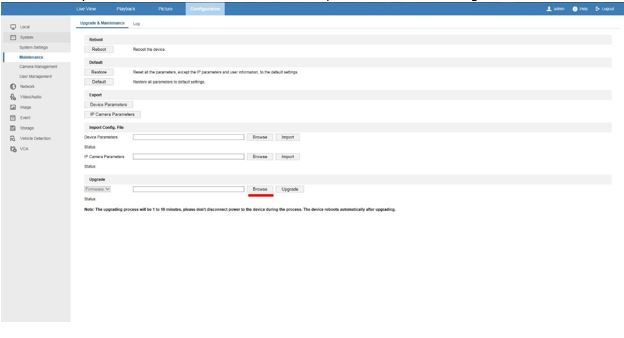
Once you are at Maintenance, at the bottom will be the option to upgrade the firmware. Select Browse and choose the firmware file you have downloaded. Make sure to unzip the file before selecting it.
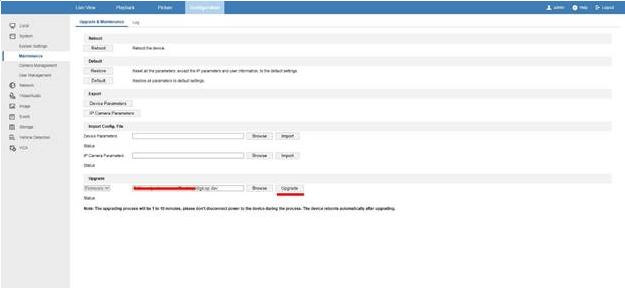
Once the file is selected, click on upgrade. This process may take a few minutes and the system will restart after the upgrade is done. Make sure the system does not lose power during the upgrading process.
Once the system reboots the firmware is now upgraded. You may need to refresh the page, to get back into the system. The page should auto refresh once the system has rebooted.
My system keeps rebooting every few minutes
You’ll need to upgrade the systems firmware to fix this issue. Try to upgrade the firmware immediately after the system has restarted to avoid a potential reboot during the upgrade process. Please follow the instructions below to do this.
Please download the firmware here: https://www.dropbox.com/s/yf6thpfyx04ag33/digicap.dav?dl=0
https://www.dropbox.com/s/yf6thpfyx04ag33/digicap.dav?dl=0
Once you have that file, put it on a flash drive and connect the flash drive to the DVR. Go to Main Menu>Maintenance>Upgrade and click on the Digicap file, then upgrade at the bottom. Once this is complete the system will reboot, and you’ll have the new firmware.
How to upgrade firmware for ONE Halo Video Doorbell Camera
How to upgrade firmware for ONE Halo Video Doorbell Camera
- Connect the camera to your WiFi network using the LaView ONE App
- Click on ‘Device Version’ in the camera menu. Or tap on the ‘Download’ icon in the camera list if newer firmware is available.
- Click on ’Upgrade’ button if newer firmware is available.
4. Wait 2-3 minutes until the upgrade process complete
How do I upgrade the firmware on my NVR?
Please use the information below to upgrade the NVR firmware using a USB flash drive.
- Go to https://www.laviewsecurity.com/cms/download/ to download the firmware for your system. Unzip the file by extracting the contents. It should be a digicap file, place the file on a USB flash drive.
- Enter the upgrade interface of the NVR. Select update file from USB device.
Menu>Maintenance>Upgrade
- Select Upgrade and the system will reboot when the upgrade is complete
Below are instructions to upgrade the firmware through the web interface:
Please follow these steps to upgrade your firmware version for your NVR. This process will be done using the web interface. To access that, enter the local IP address into Internet Explorer. Be sure to download and install the plug in when you first visit the web interface.
To obtain the local Ip Address for the NVR follow these quick instructions:
These steps will be performed from the NVR system directly.
Open the main menu and go to Maintenance>System Info>Network. In there you will have a section called IPv4 Address. This is your local IP address, and the one you will be using to access the web interface.
Once you enter the Local IP address onto Internet Explorer, you will be prompted to log into your system. Use the log in credentials that you would use from the system itself.
Once you are logged in we will go to Configuration at the top of the screen.
Then we will click on Maintenance on the left-hand side under System Settings
Once you are at Maintenance, at the bottom will be the option to upgrade the firmware. Select Browse and choose the firmware file you have downloaded. Make sure to unzip the file before selecting it.
Once the file is selected, click on upgrade. This process may take a few minutes and the system will restart after the upgrade is done. Make sure the system does not lose power during the upgrading process.
Once the system reboots the firmware is now upgraded. You may need to refresh the page, to get back into the system. The page should auto refresh once the system has rebooted.
How do I upgrade firmware to LaView ONE cameras?
You can check the camera firmware version in the camera configuration menu. When newer firmware is available, the App will show you newer firmware information there.
How Do I upgrade my system’s Firmware?
Make sure to download your firmware from our website here: https://www.laviewsecurity.com/cms/download/
Once the file is downloaded, extract the file and place it onto a flash drive. Then connect the flash drive to a USB port on the NVR.
Please go to Main Menu>System>Maintenance>Version and select upgrade. Choose your Firmware file from the list.
Where can I download the latest firmware?
You can download the latest firmware Here








my recorder is not working
please provide support for me i leave my email address
can you help me please
my recorder is not working
It really worked, I appreciate it!
problem not solved thanks
Can you write your contact number?
It was a great sharing
problem not solved thanks
problem not solved thanks
It really worked, I appreciate it!
please provide support for me i leave my email address
hello nice sharing thanks
my recorder is not working
my recorder is not working
my recorder is not working
Can you write your contact number?
my recorder is not working
I can’t upload
I am having trouble with the installation
It was a great sharing
I sent an e-mail from the communication channel. Can you help?
It really worked, I appreciate it!
Can you write your contact number?