Views: 15
Eseecloud Wireless PTZ Camera User Guide,EseeCloud is a simple, stylish, user-friendly and powerful mobile video surveillance software. We are committed to continuously improving our video processing technology and video innovation technology, and providing global security products, professional industry solutions and superior services to continuously create greater practical value for our customers.
Add device
Video:

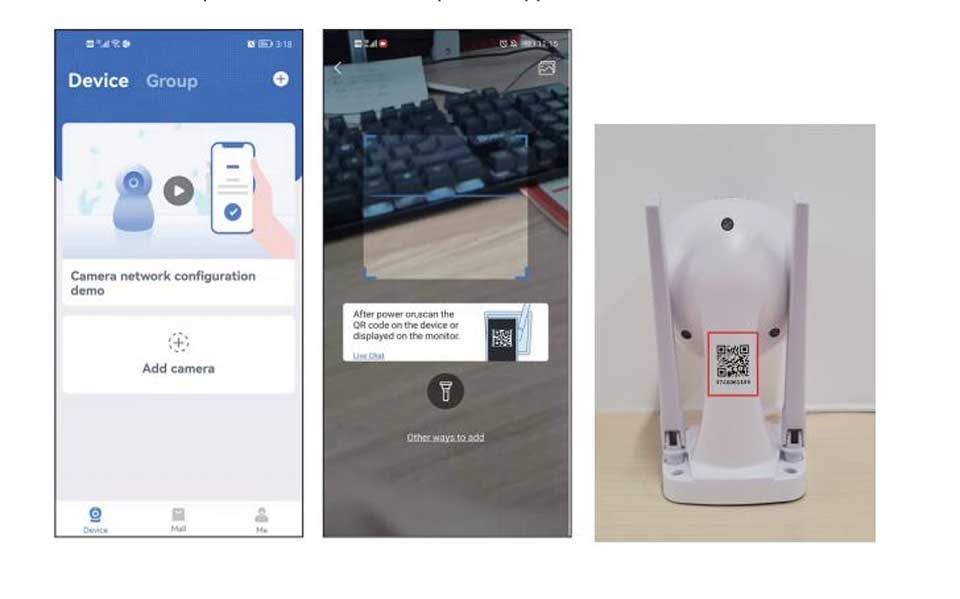
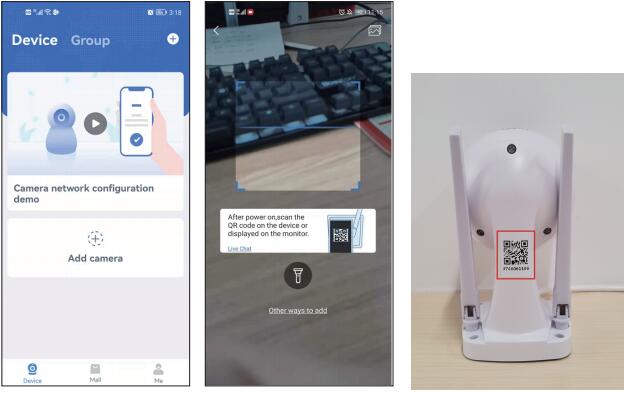
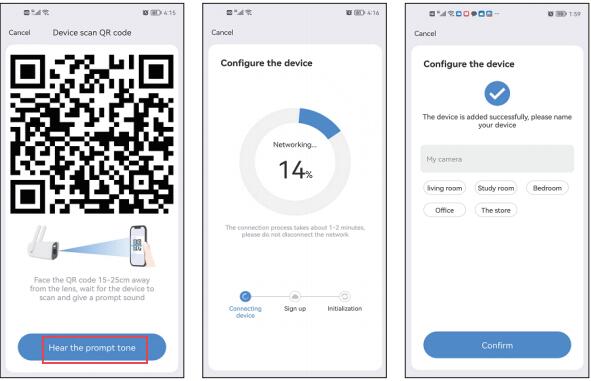
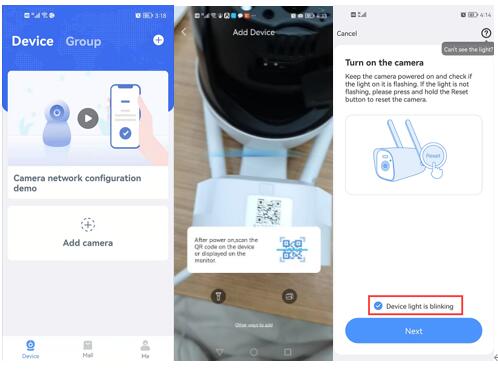
1, It makes a beep after reset the camera, open the App, click “+ Add camera” –scan QR-code on the camera.
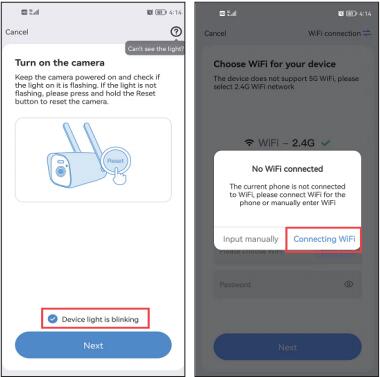
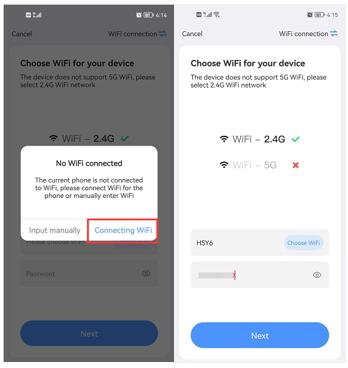
2, Click “Device light is blinking”—Next, then connect your home wifi.
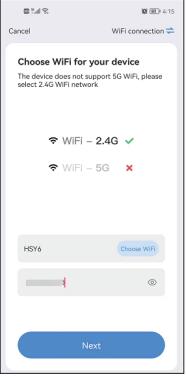
3, Select your home wifi (the camera only support 2.4Ghz wifi, not support 5Ghz), click “next”.
Note: The wifi name and password don’t including special character and the wifi password don’t over 12 character.
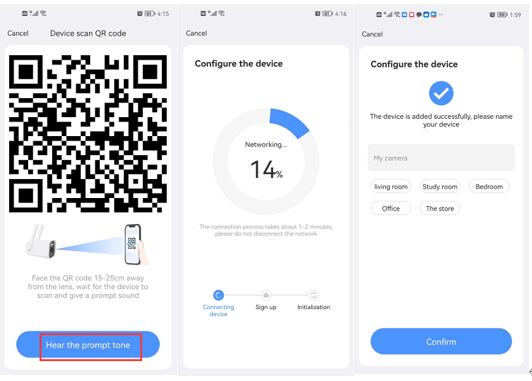
You will get a QR code on your mobile phone, aim the QR code of the mobile phone at the camera lens at a distance of 4-5FT.
when you hear the prompt voice, click the blue button below, wait for device to connecting successfully, then edit the device name.
Add device with network cable
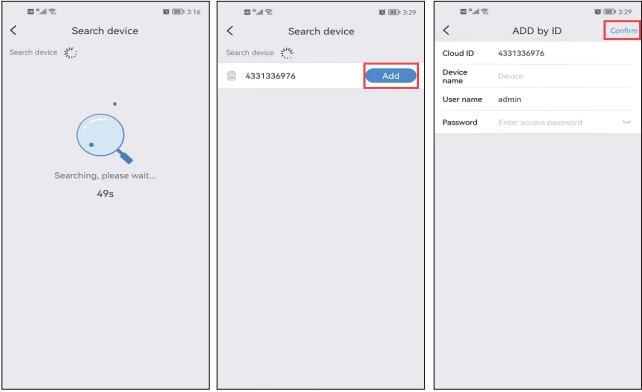
1.Please using the network cable connect camera to your router, then click “other ways to add”—More ways to add–select “LAN scan”.
2.It will search device automatically, when find device, click Add. You don’t need to input any password, just click “Confirm” on upper right corner.
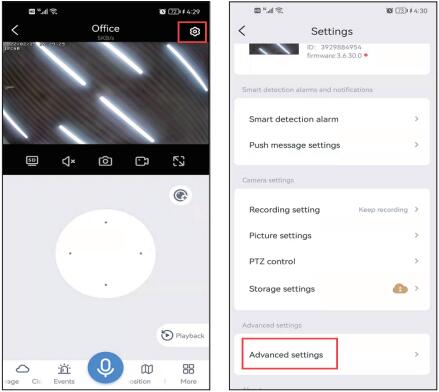
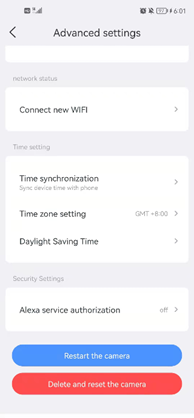
3.After add successfully, please click setting icon–click Advanced settings.
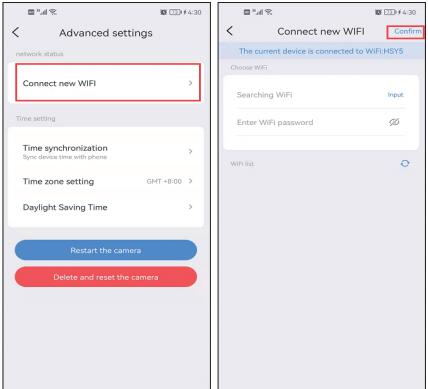
4.Connect new WiFi–select your home WIFI and input password–Confirm. Then unplug network cable.
Eseecloud Wireless PTZ Camera User Guide
Read More : CloudEdge WiFi Camera Setup Guide 2023
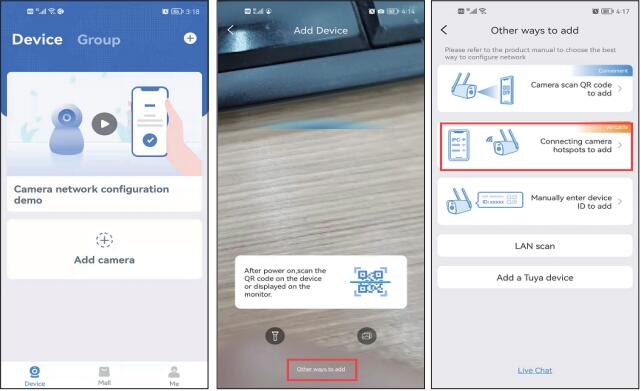
Add Device Via Camera Hotspot
1, Please click “Add camera”—other ways to add—Connecting camera hotspot to add.
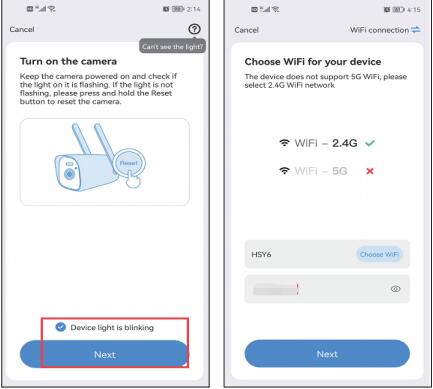
2, Check “Device light is blinking” and click Next, then connect your home wifi, and click Next again.
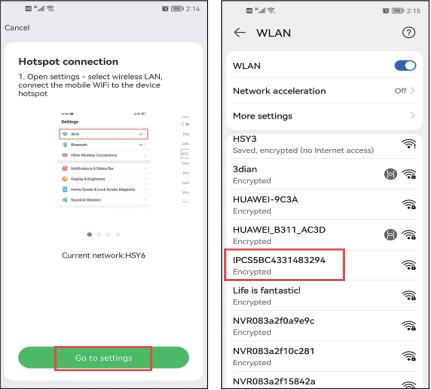
3, Click “Go to settings” to connect camera hotspot, find hotspot IPC*********, input password”11111111”.
It doesn’t matter if it showing not network, just click ok, then go back to app.
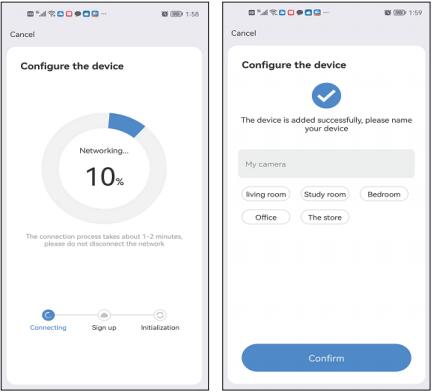
4, Finally, wait for device to connecting successfully, then edit the device name.
The camera often offline
1, Check whether the camera antenna is vertically upward.
2, please confirm the distance between the camera to your router, it better within 30FT, if the distance too far, the camera will offline.
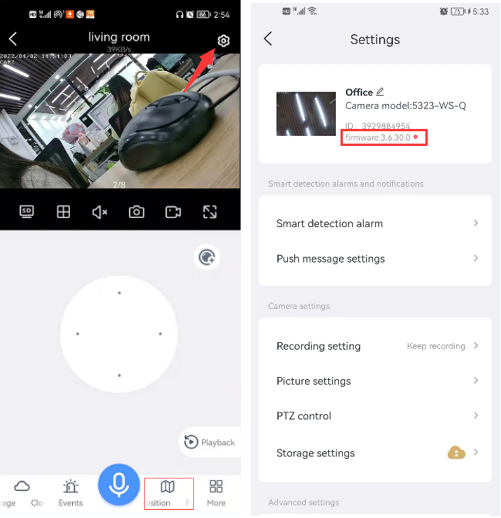
3, If still offline, please give your camera version, we will give you a firmware to upgrade camera, it can enhances the camera’s signal.
Camera can’t connect to wifi
1, please confirm wifi is 2.4G or 5G, the camera only support 2.4G. And wifi password cannot exceed 12 characters.
2, if it is 4G wifi, please place the camera next to the router, then press the reset button for 6 seconds to add device again.
3, or you can connect the camera to your router with network cable, then switch to wirelessly connection.
How to using PTZ function on NVR?
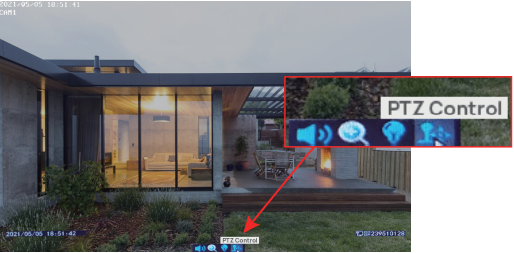
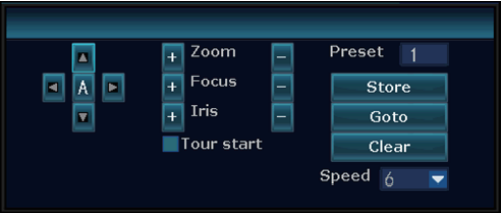
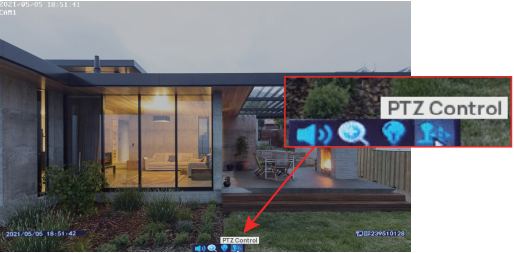
1, please left click your mouse, you will see a smart menu below, click PTZ control.

Please note, if your camera is digital camera, you can’t zoom in or out in this interface, it only suit for optical zoom camera.
You need to go back to main menu, left click mouse again, click zoom in, then roll you mouse to zoom in.
but when you zoom in, the camera image will blur.
How to share the device to other one?
a, Please go to the app–click “Share” icon–select permission and effective time.
b, after click complete icon, you will get a QR-code.
Please note that another phone must first download the application “esecloud” and then register a new account. One account cannot log in to two mobile phones at the same time.
Unable to hear camera sound
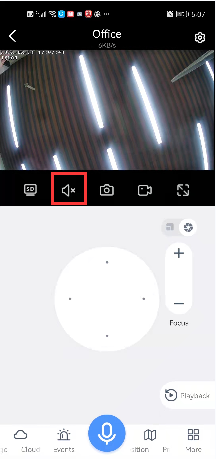
If “x” is displayed on sound option, it is not turned on, you need to turn on first.
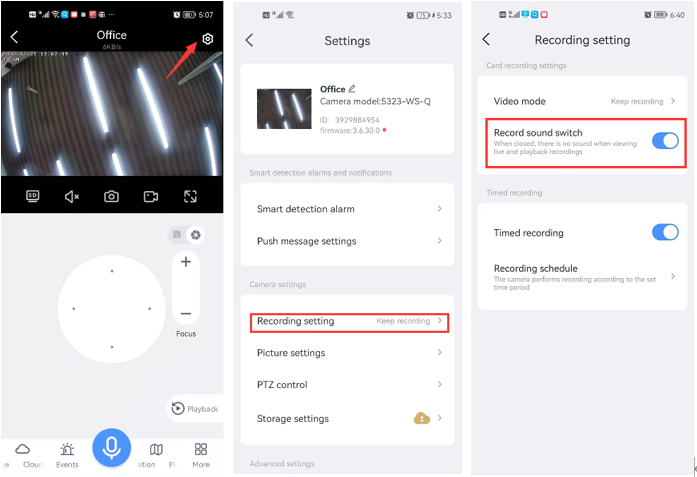
If still can’t hear sound, please go to setup interface—recording settings—verify that the “Record Sound Switch” option is enabled.
How to connect the camera to Alexa?
This is the link about how to connect the camera to Alexa, please refer it.
https://www.amazon.com/vdp/02b7820dd64d4ad6a457fcfd8638e830?ref=dp_vse_ibvc1
If Alexa showing “Live view not supported”, please don’t worry, this is Alexa app issue,
Actually it can view camera on Echo Show. Write your article here
How to setup motion tracking
If you add camera to NVR, please go to video detection to check whether your nvr support motion tracking.
Usually, NVR not support motion tracking, you need to add camera to the app Eseecloud, then add to NVR, so that you can setup motion tracking on the app.
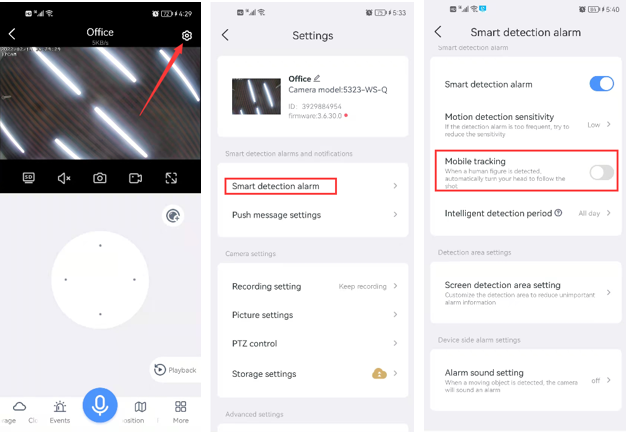
1, Into device—click setting icon on upper right corner—go to smart detection alarm—enable motion tracking option.
How to set preset position cruise
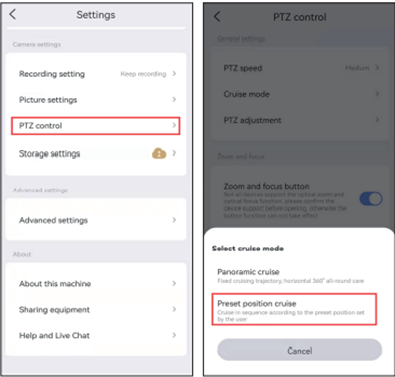
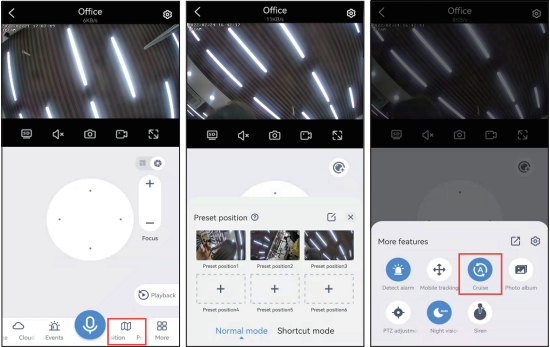
1, go to setting interface—ptz control—cruise mode—select preset position cruise.
2, go back to record interface–click Preset–add more than two different positions–go to More–click cruise.
After setting successful, the camera will cruise within the preset position range.
Camera not recording after install SD card
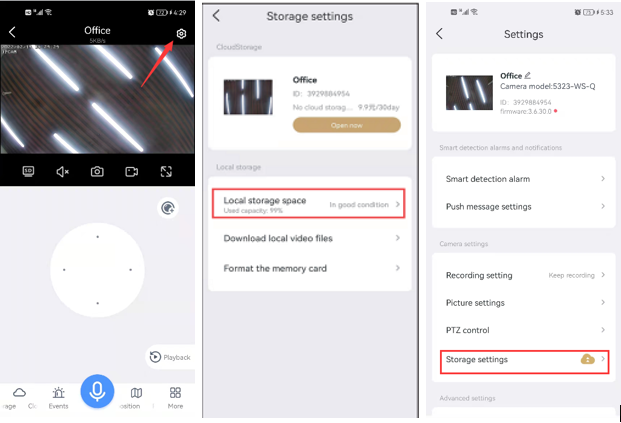
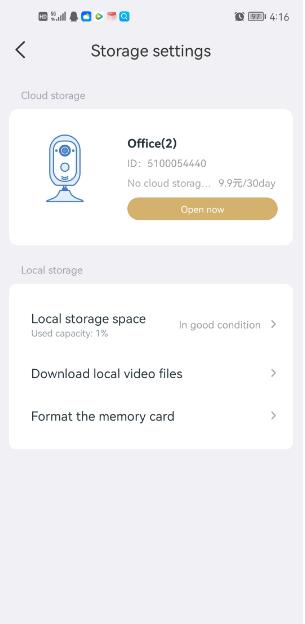
1, Please go to setting interface–Storage setting–local storage space–check the status of the SD card.
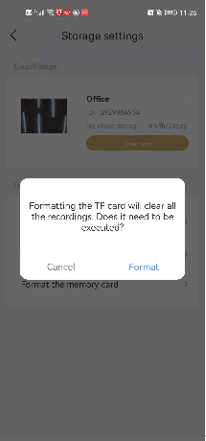
2, SD card is in normal status, please check if SD card capacity is full, and then format the SD card.
3, If showing no SD card, please take the SD card out and insert it again. (Please keep the power off before inserting the SD card)
Alexa not skill Eseecloud
1, Please check if you have enable Alexa option on the app, click setting icon, advance settings, Alexa service authorization.
2, you need to login Eseecloud account with phone number or Email address, If you use third-party software to log in to Eseecloud, such as Google, you cannot log in to Eseecloud on Alexa
Please note, If Alexa can not find camera, please check if you have setup a name for camera.
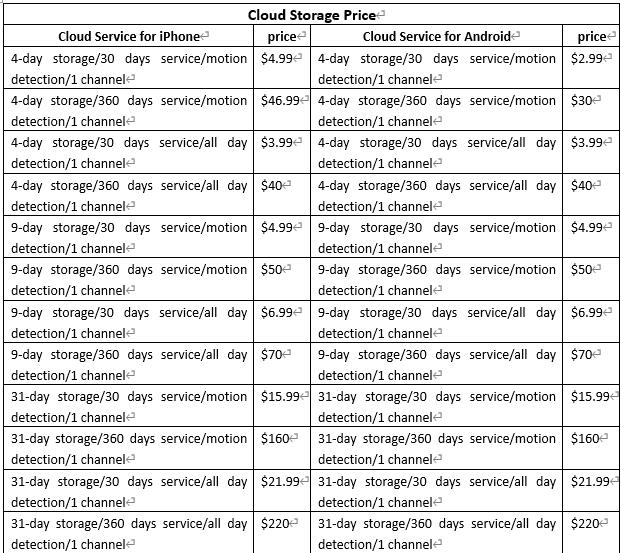
Eseecloud Cloud Service Fee Standard
upgrade the ptz camera to new version.
We have upgrade our ptz camera version, you can scan the QR code to add the device without connecting camera hotspot.
and you can add the camera to nvr directly, don’t need to input password.
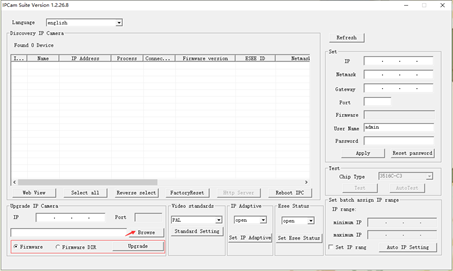
1) connect the camera to the same network as your computer with a network cable, then download a tool to search your camera IP, copy firmware to your computer. this is the link of tool.
http://download.dvr163.com/tool/IPCamSuite-1.2.26.8.zip
after you dowaload the tool successfully, please open it and click refresh to find the camera ip. upload the firmware and click upgrade. Write your article here
please note, when upgrading the camera, please do not unplug the power or reset the camera, otherwise the camera will crash.
if you want to upgrade your camera version, please email johnny@hiseeu.com to get a upgrade firmware.
Fixed-point cruise on NVR
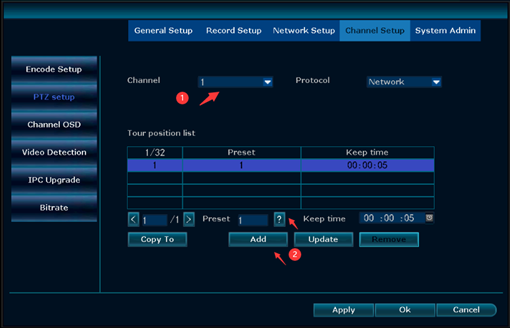
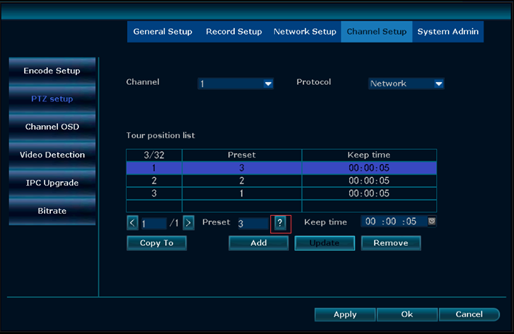
1) Right click the mouse–system setup–channel setup–PTZ setup. select correct channel. Add first cruise point,
2) click add to set first position (the default is 1, which does not need to be changed),
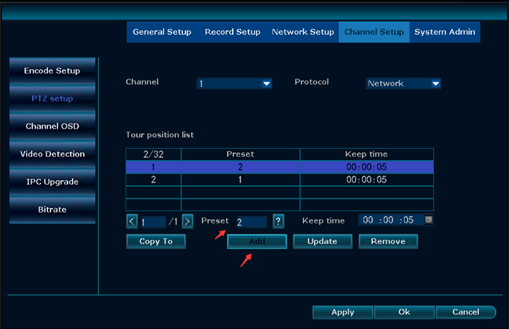
3) then click preset box select 2–add, add multiple cruise points in this way. You also can select “keep time” you want, preferably in five seconds or more.
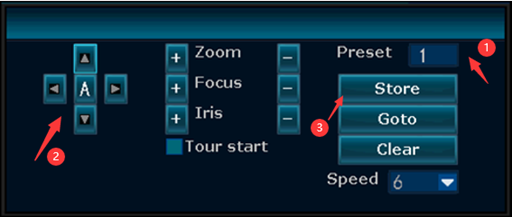
4) And then click “?” question mark into the PTZ control interface–click PTZ control option to set first position, then click store.
5) change the preset box to 2, adjust the camera lens to second position–store
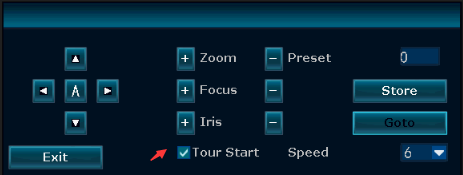
6) right click anywhere –return to the PTZ setting interface–apply—ok.
After connect to mobile phone, camera showing “wrong password” on NVR.
If you are adding camera to your mobile phone through camera hotspot , it will generate a random password.
1, Go to app Eseecloud, click three points icon on right upper corner, click edit. Fast click 6 times on blank area,
you will see random password.
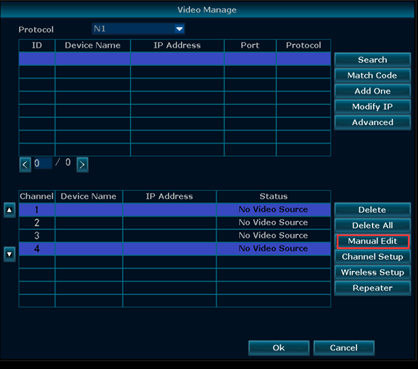
2, Go to NVR, right click mouse—video manage—manial edit.
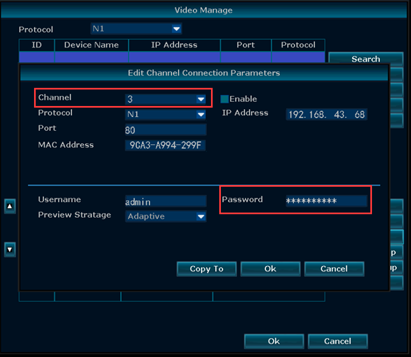
3, select channel—input random password, click ok,
If still showing connecting fail, please click match code to match camera.
The camera will turn to the wall or the ground
1. Please confirm whether to manually rotate the camera lens. If so, the camera will not return to its original position after restarting or automatic tracking.
please unplug the power adapter, then plug it in again, click PTZ on the mobile app or NVR to control the camera lens.
2. If you do not turn the camera manually, please tell us your camera ID number and version information, and we will feed back to our technical support.
How to add camera to Eseecloud
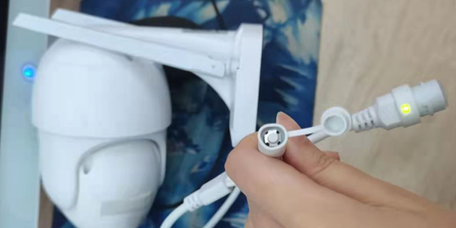
1. Press and hold the reset button until you hear the notice sound of the camera turning on, If you cannot find the reset button, please refer to the appearance description on the previous page 3.
2. Click Add camera—scan QR-code on camera– Click “Device light is blinking”—Next.
The camera not recording
1, if you are insert SD card, please go to settings interface–storage settings, check the status of SD card, if capacity is full,
please format it first.
If you can’t see SD card info on this interface, please take the SD card out and insert it again.
For cloud dtorage not recording,
Please check whether the cloud storage has been purchased on storage settings interface. If yes, please email us your camera ID, and we will ask technical support to check it for you. email address is johnny@hiseeu.com.
